You can Remove Windows Terminal from the Context menu in Windows 10. The “open in Windows Terminal” item appears there after installing the app from the Microsoft Store.
Now the command to launch the Windows Terminal app in an open directory is integrated directly into the context menu. All you need to do is right-click on an empty space or folder and select Open in Windows Terminal.
If you are unhappy with the addition of another item to the Explorer menu, this article is for you.


For reference: Windows Terminal is preinstalled by default in Windows 10 starting with build 21337. It is a kind of advanced version of Command Prompt and PowerShell. In addition to the functions of these two applications, Windows Terminal provides users with a number of additional features, such as support for tabs, hardware acceleration, profiles, and so on. Windows Terminal is open source, so interested developers can participate in the development of this project.
To get rid of the Open in Windows Terminal item in the Explorer menu, you need to add it to the list of blocked extensions in the Windows registry.
This tutorial will show you how to remove Windows Terminal from the Explorer context menu. To complete this procedure, you need an account with Administrator privileges, otherwise you will not be able to make the required edits in the Registry Editor.
Remove Windows Terminal From Context Menu
- Open the Registry Editor app. Press Win + R and type
Regedit. -
Open the following Registry key.
HKEY_LOCAL_MACHINE\SOFTWARE\Microsoft\Windows\CurrentVersion\Shell Extensions\Blocked. If Shell Extensions key does not contain a Blocked folder, right-click Shell Extensions and select New – Key. Name it Blocked. - On the right, create a new string (REG_SZ) value
{9F156763-7844-4DC4-B2B1-901F640F5155}. Leave its value data blank.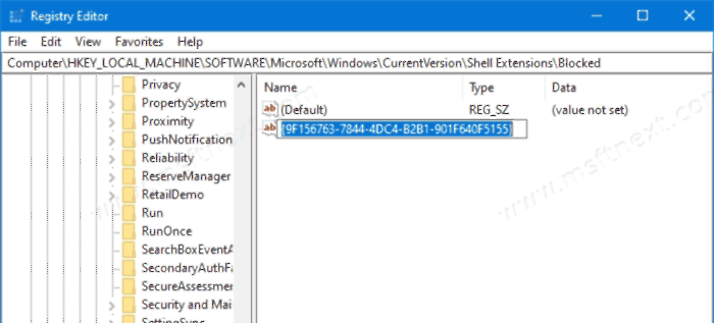
- Log out or restart your computer to apply the changes.

The open in Windows Terminal context menu entry is now removed.
If you want to put everything back in place, just delete the {9F156763-7844-4DC4-B2B1-901F640F5155} value you just created in the Windows Registry and restart your computer.
You can save yourself time and clicks by using ready-made files to automate the process. Download the archive from the link:
After adding the files to the registry, restart your computer.
-
Remove Open in Windows Terminal context menu.reg– removes the Windows Terminal item from the right-click menu. - To revert everything back, apply the
Add Open in Windows Terminal context menu.regfile which restores the command in the right-click menu.
