In Windows 8, Microsoft introduced the Ribbon UI in File Explorer so various commands can be more prominently displayed when you need them. Windows 10 also comes with the Ribbon feature in File Explorer.
There are plenty of users who do not like the Ribbon UI. While it is possible to get the command bar and menu bar back in Windows 10 using unofficial methods, there is no supported option for that in File Explorer settings. This post explains how to hide and disable the Ribbon in Windows 10.
Disable Ribbon in Windows 10 Explorer
- Download the Ribbon Disabler app from Winaero: Download Ribbon Disabler.
- Extract the ZIP archive. There you will find two versions of the app. If you are running Windows 10 64bit, then use the app from the x64 folder, otherwise use the app from the x86 folder. If you don’t know which edition of Windows you are using (x86 or x64), right click the ‘This PC’ icon in File Explorer, then click Properties. It will show you if your Windows is 32-bit or 64-bit.
- Run Ribbon Disabler and click the “Disable Ribbon Explorer” button. Confirm the UAC prompt.
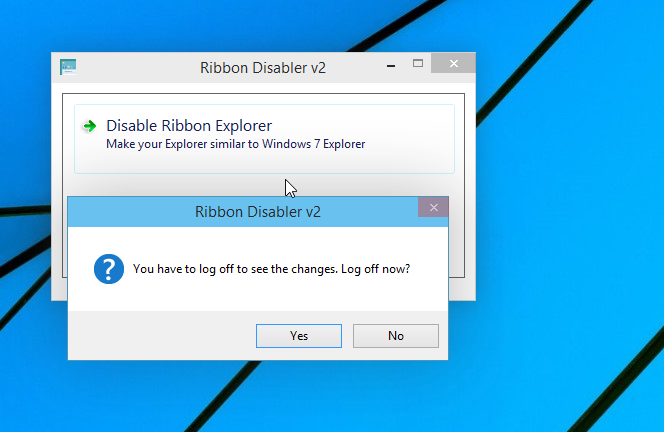
When it asks you for a log off, click “yes”. - Sign in back. The Ribbon UI is now disabled.


To restore the Ribbon later, run Ribbon Disabler once again and click ‘Enable Ribbon Explorer’.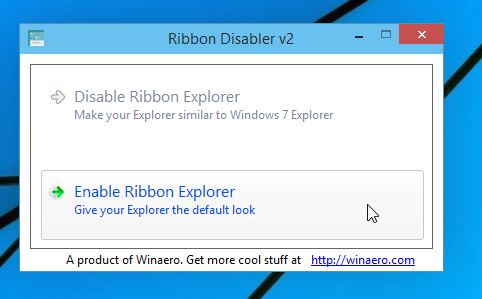
Log off when prompted and sign in back. The Ribbon will be enabled.

Instead of removing the Ribbon UI, you can just hide. This can be done without using 3rd party tools.
Hide or show the Ribbon
With a hotkey
Windows 10 provides a built-in way to minimize the Ribbon in File Explorer. You can just press the Ctrl + F1 keyboard shortcut in any open Explorer window, and the Ribbon will be minimized.

To show it again, press the Ctrl + F1 shortcut once again.
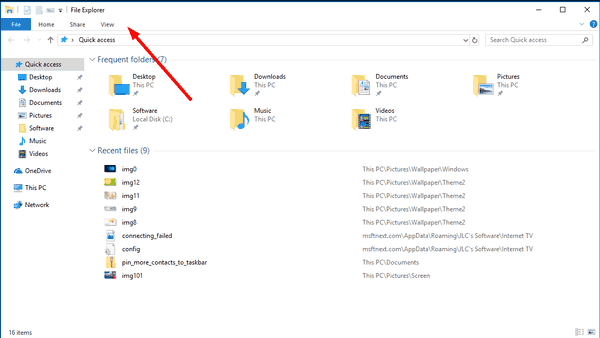
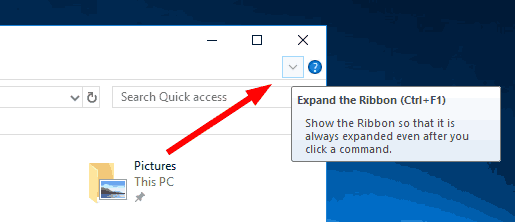
Click the small arrow in the top right corner of the Explorer window, to minimize or show the Ribbon. Or you can simply double click on any of the Ribbon tabs to minimize it, and double click again to restore it. See the next screenshot.

Using a Group Policy option
If you are running Enterprise, Education or Professional edition of Windows 10, you can use Local Group Policy Editor to hide or show the Ribbon for users.
- Press the Win + R keys together on your keyboard.
- Type
gpedit.mscin the Run text box.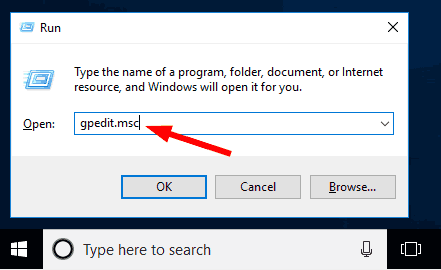
- On the left, go to User Configuration \ Administrative Templates \ Windows Components \ File Explorer.
- On the right, double-click the option ‘Start File Explorer with Ribbon minimized’ and set it to ‘Enabled’.
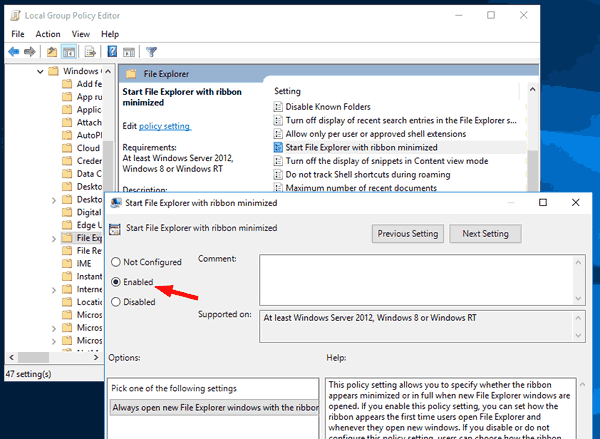
- Select desired mode for the option in the next dialog.


With a Registry tweak
If your Windows 10 edition doesn’t include the Local Group Policy Editor, you can use a Registry tweak to configure the same policy option. This methods works in all edition of the OS.
- Press the Win + R keys together on your keyboard and type
regeditin the text box. - Go to the branch
HKEY_CURRENT_USER\Software\Policies\Microsoft\Windows\ExplorerIf this key is missing, create it manually. - Create a new 32-bit DWORD value ‘ExplorerRibbonStartsMinimized’.
- To start Explorer with the Ribbon always minimized, set its value data to 3.
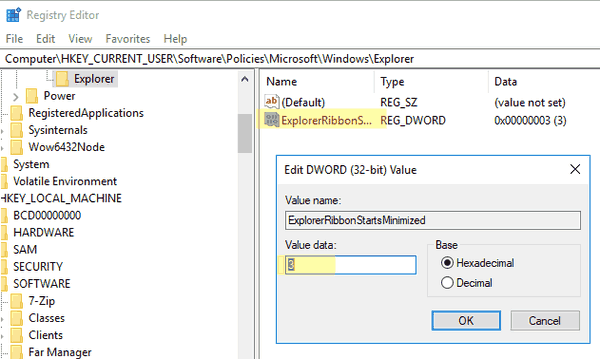
- To start Explorer with the Ribbon always maximized, set it to 4.
- Delete the ‘ExplorerRibbonStartsMinimized’ parameter to restore the default behavior.

