User Account Control, or just UAC is a part of the Windows security system which prevents apps from making unwanted changes on your PC. When some software tries to change system-related parts of the Registry or the file system, Windows 10 shows an UAC confirmation dialog, where the user should confirm if he really wants to make those changes.
Thus, UAC provides a special security environment for your user account with limited access rights and can elevate a particular process to full access rights when necessary. However, many users are not happy to see these UAC prompts and prefer to use Windows 10 with the classic security model, i.e. by creating limited and administrator accounts like in Windows XP and earlier. If you are one of those users, here is how to disable UAC and get rid of its popups in Windows 10.
Note: Having UAC enabled is additional protection from dangerous apps and viruses which can elevate silently if it is disabled and do anything malicious on your PC. It is not a good idea to disable it without a reason.
There are two ways to disable UAC in Windows 10.
Disable UAC in Windows 10
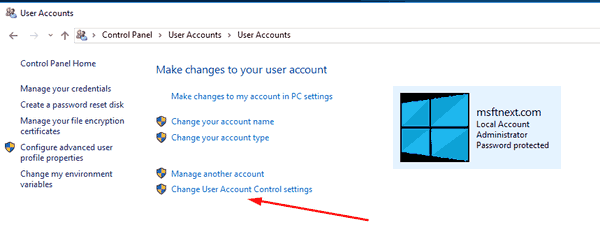
- Open Control Panel.
- Navigate to Control Panel\User Accounts\User Accounts.
- Click on the link ‘Change User Account Control settings’.
- Move the slider control down to the ‘Never notify’ position and click ‘OK’.
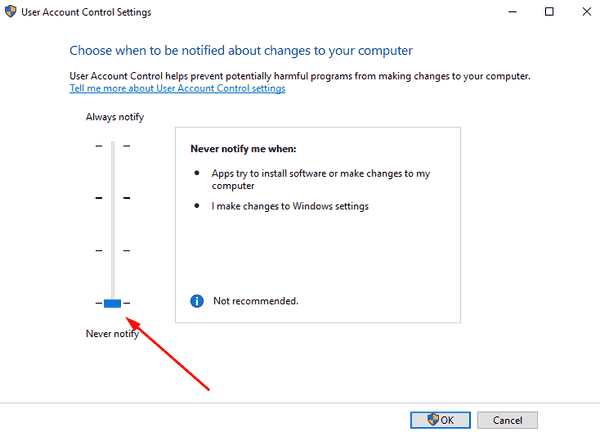
- The UAC is now disabled.
Alternatively, you can disable UAC with a Registry tweak.
Turn off UAC with a Registry Tweak
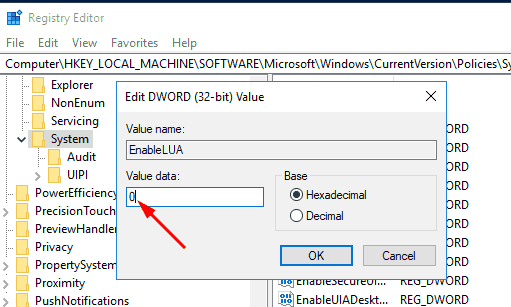
- Press the Win + R keys and type ‘regedit.exe’ in the Run window.
- In Registry editor, go to the branch
HKEY_LOCAL_MACHINE\SOFTWARE\Microsoft\Windows\CurrentVersion\Policies\System - On the right pane, modify the data value of the EnableLUA dword value and set it to 0.
- Restart Windows 10.
If the registry path doesn’t exist in your OS, then create the missing keys manually. The User Account Control feature will be disabled after reboot.