How to Disable a Network Adapter in Windows 10
In Windows 10, the modern Settings app still doesn’t allow to quickly disable a network adapter. Here are the alternative ways to disable a network adapter in the OS.
With Windows 10, Microsoft has moved most of the network options to Settings. Setting and the new Network pop-up which appears when you click on the network icon in the system tray look completely different from what we had in Windows 7 and Windows 8.1. As of now, the modern Settings UI doesn’t come with an option to disable a network adapter quickly. Instead, we can use a number of classic tools & utilities.
Windows 10 shows a list of available Wi-Fi networks with a special network pane. It also shows the network that you are currently connected to. Using that Network pane, you can open Network & internet settings or enable or disable Wi-Fi, Mobile Hotspot and Airplane mode. But not the network adapter!
To disable a network adapter, you can use either
- the classic Network Connections folder,
- Device Manager,
- Netsh,
- or PowerShell.
To disable a network adapter in Windows 10,
- Open the classic Network Connections folder (Press Win +R, type shell:::{992CFFA0-F557-101A-88EC-00DD010CCC48}, press Enter. See this post).
- Right-click the network connection for the adapter you want to disable.
- Select Disable from the context menu.
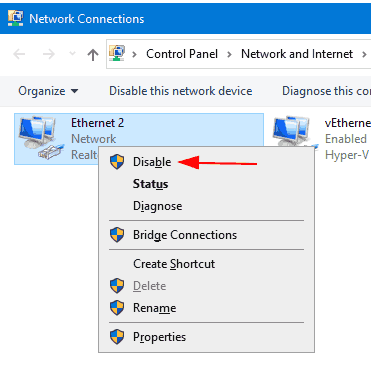
- The network adapter will be disabled along with the network connection.
The same way, you can enable the disabled connection by right-clicking it and selecting “Enable” in the context menu.
Disable a Network Adapter with Device Manager
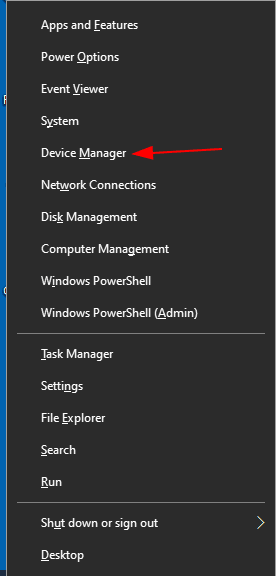
- Press the Win + X keyboard shortcut and click/tap on Device Manager.
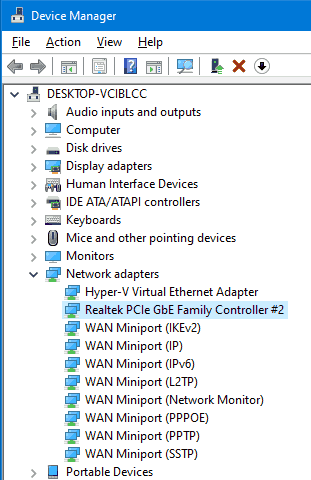
- In the device tree, find your device.
- Right-click on the network adapter and select “Disable device” from the context menu.
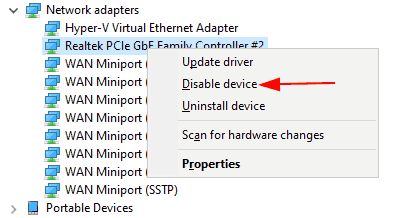
- The network adapter will be disabled.
To re-enable the disabled network adapter, right-click on it in Device Manager, select “Enable device” from the context menu.
Disable a Network Adapter using Netsh
Netsh is a console utility which allows you to customize a lot of network options. Here is how you can use it to disable a network adapter.
- Open a command prompt as Administrator.
- Type the following command:
netsh interface show interface. Make note of the Interface Name value for the network adapter you want to disable.
- Type the following command to disable the network adapter
netsh interface set interface "Ethernet 2" disable. Substitute theEthernet 2potion with the name of the network interface you want to disable.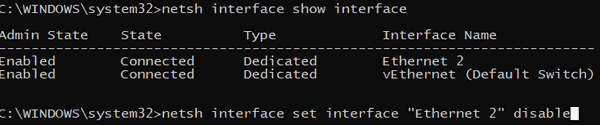
- The network adapter related to that network interface will be disabled.
- The undo command:
netsh interface set interface "Interface Name" enable.
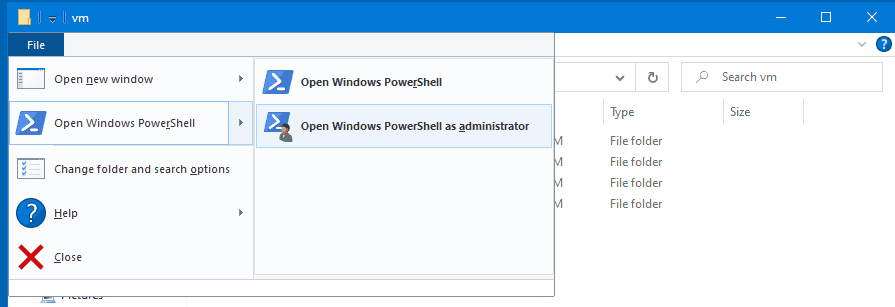
Disable a Network Adapter with PowerShell
PowerShell is an advanced form of command prompt. It is extended with a set of cmdlets and allows using .NET framework/C# in scripts.
To disable a Network Adapter with PowerShell,
- Open a PowerShell console as Administrator.
- To see available network adapters, run the command
Get-NetAdapter | format-list.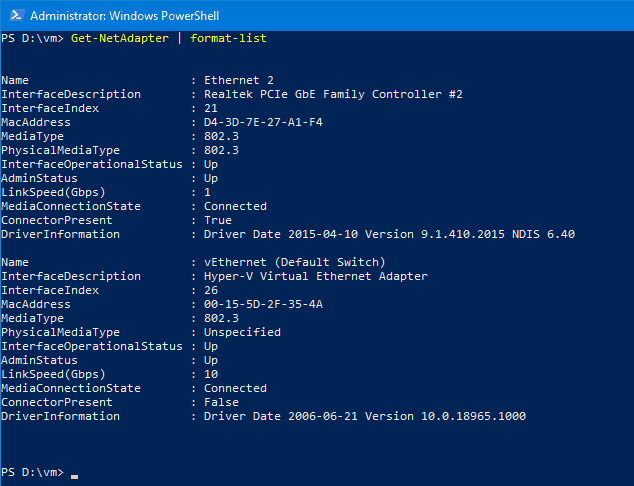
- Make note of the network adapter name.
- To disable the adapter, run the command
Disable-NetAdapter -Name "your network adapter name" -Confirm:$false. Substite “your network adapter name” portion with the actual network adapter name from the step 2.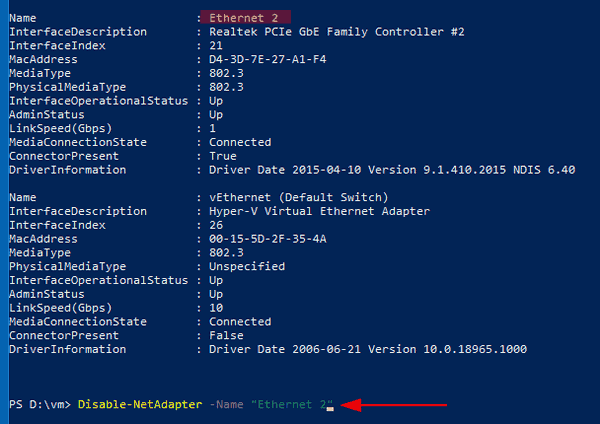
- The undo command is
Enable-NetAdapter -Name "your network adapter name" -Confirm:$false.
That’s all about disabling network adapters in Windows 10.