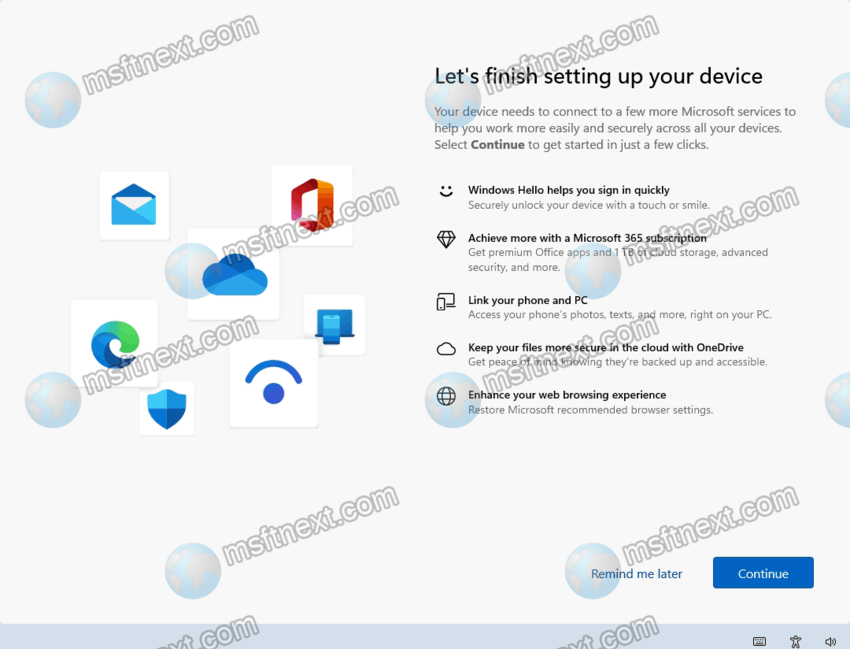
When a Windows 11 / Windows 10 PC undergoes feature updates, a welcome experience screen pops up with the message “Let’s finish setting up your device,” which provides details about the new features added to the current build of your PC. Traditionally, the initial Windows setup procedure is performed at the final stage of OS installation. But it may reappear time after installing or updating Windows.
SCOOBE (stands for Second Out-of-the-box experience) is the name of this screen, and it has a typical appearance for both Windows 10 and Windows 11, with the only difference being in design. However, neither version offers the option “Do not show again,” and instead allows users to only postpone the screen’s appearance by selecting “Remind me later” or “Remind me in 3 days.”
Although it’s possible to forcibly close the screen by accessing the Task Manager with Ctrl +⇧ Shift +Esc and ending the processwebexperiencehostapp.exe, this may not always be the best option.
For one, the Task Manager is likely to be hidden beneath the SCOOBE screen, making it difficult to access. Additionally, terminating the process will not prevent the setup screen from appearing again in the future.
While the screen is helpful for initial setup, seeing the same screen repeatedly after updates and when logging in can be frustrating for users. Here’s how to disable it.
Disable the Let’s finish settings your device screen
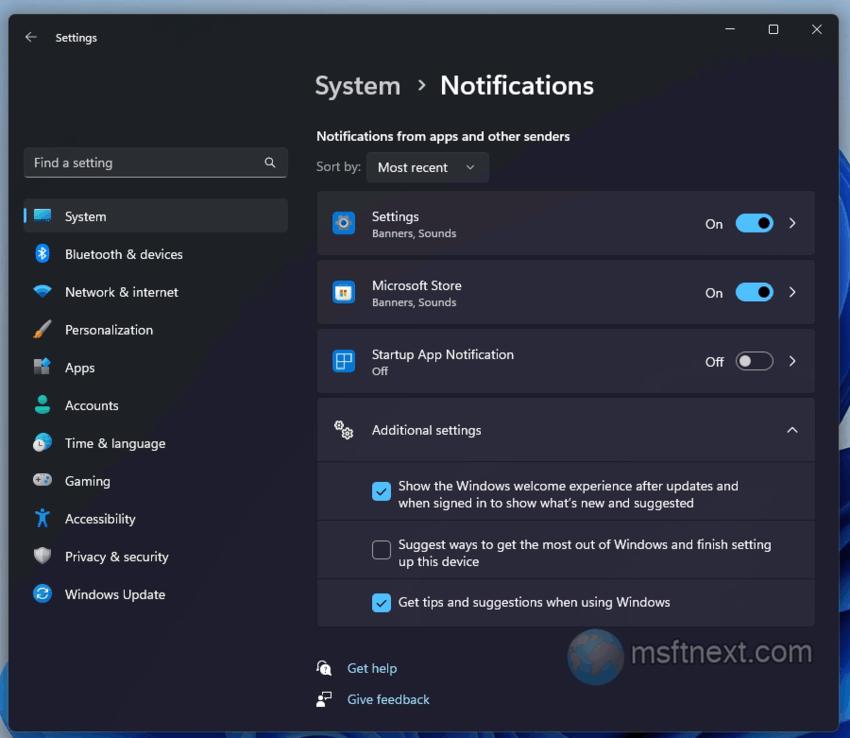
- Open the Settings app by pressing the ⊞ Win + I key combination.
- Click to the System tab in the left panel.
- In the right, click Notifications.
- On the Notifications page, scroll down to the bottom until you see and select Additional settings and click to expand them.
- Among the options you now see, remove the check mark from the Suggest ways to get most out of the Windows and finish setting up this device option.
disable the Lets finish setting up your device screen d
You have successfully disabled the “Let’s finish settings your device” screen.
If you do not have this setting, you can use the Registry Editor to disable the intrusive SCOOBE screen prompts .
The Registry Editor Method
Download the ready-made registry files from this link. Double-click it to merge its data with the Registry, then restart your computer.
The tweak creates three settings in the registry that are responsible for the three Settings options shown above and works on both Windows 11 and Windows 10. Iit disables all three options.

The setup completion screen will no longer appear, unless Microsoft changes something for the settings in upcoming releases of Windows 11 and Windows 10.
If you prefer to change the Registry manually, do it by following the guide below.
Editing the Registry manually
- Click somewhere in the search box on the taskbar.
- There, type
regedit, and once Registry Editor will appear in the search results, click it.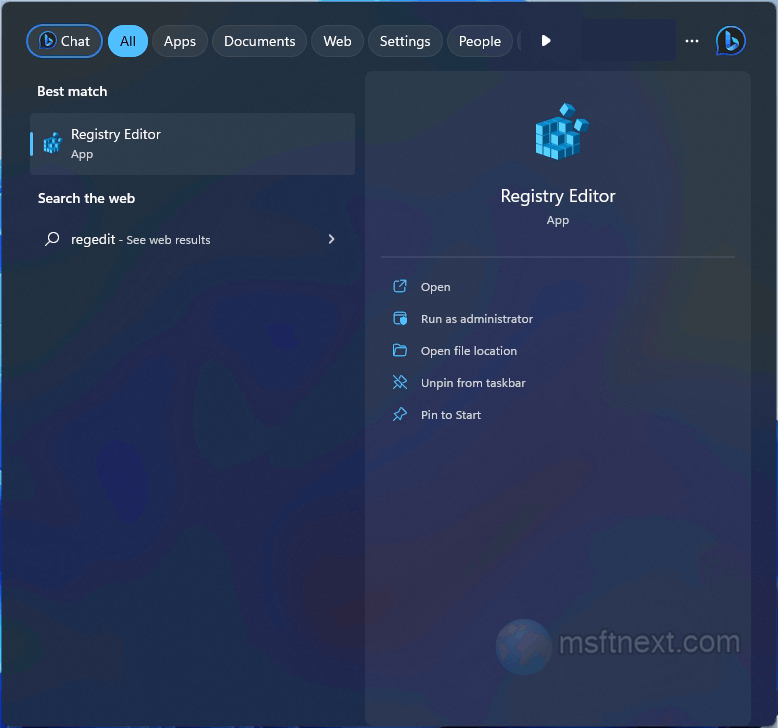
run registry editor - Browse to the HKEY_CURRENT_USER\Software\Microsoft\Windows\CurrentVersion\UserProfileEngagement branch.
- To disable the finish the device setup screen, create here a new 32-bit DWORD value under this key called ScoobeSystemSettingEnabled and set its value to 0.
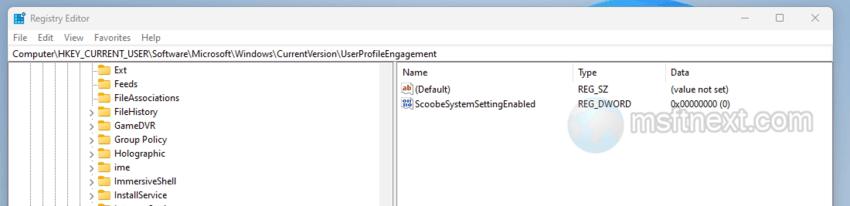
ScoobeSystemSettingEnabled
Note: If the UseProfileEngagement folder is missing, then you need to create it manually. Do get that done, right-click on the CurrentVersion key, then select New > Key from the menu, and name it UserProfileEngagement.
Now you can select the UserProfileEngagement key, right-click it and select New > DWORD (32-bit) value. As you already know, you need to name it ScoobeSystemSettingEnabled. Keep its value 0.
Finally, you can close the Registry editor and restart your PC to apply the changes.
Thanks for the article.
I am looking for such a solution, but not only for the logged in user, but globally for Windows.
So that on a computer with e.g. 5 profiles I don’t have to log in to each one and turn it off separately.
Do you have any idea about this?