You can make Windows 11 display tray icons on two rows. The notification area, also known as the system tray, is the area of the graphical interface where desktop applications running in the background place their icons. If the icon does not fit in the tray, it falls into the overflow area – an area of the system tray, which can be viewed by clicking on the up arrow to the left of the visible icons.
If you want to see more icons in the tray, you can enable a hidden feature to display tray icons in two rows. Displaying icons in the notification area on two lines saves space on taskbar, but you will see more icons without hiding them in the drop-down flyout. See the following image.
![]()
As with many other hidden settings in Windows 11, you can access this option via the registry.
To have Windows 11 display tray icons in two rows, follow these steps.
Display tray icons on two rows in Windows 11
- Press the ⊞ Win + R keys and enter
regeditin the Run window to open Registry Editor. - Go to the branch
HKCU\Software\Microsoft\Windows\CurrentVersion\Explorer\StuckRects3 - In the right column you will see the binary parameter Settings, double click on it to open the edit window.
- To display the tray icons on two rows, change the item from 01 to 02 in row 00000028 and column FE .
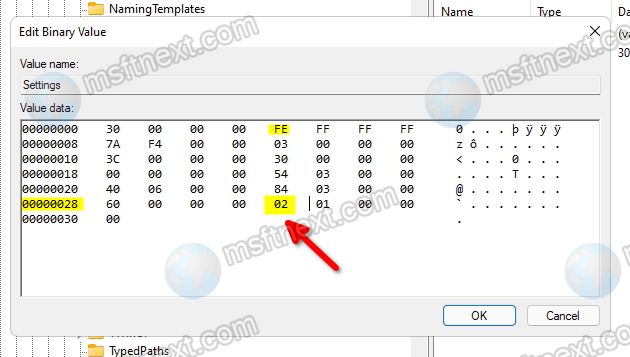
- To replace, place the mouse cursor to the right of the value, press ← Backspace and enter a new one. Click OK to apply the changes.
The settings will take effect after restarting Explorer or rebooting into the system.
The Windows 11 taskbar will now show system tray icons on two lines in the corner of the taskbar.
Once you decide to undo a change, that’s easy too. Just open the HKEY_CURRENT_USER \ Software \ Microsoft \ Windows \ CurrentVersion \ Explorer \ StuckRects3 key in the registry and change the value of cell 00000028 and FE to 01.![]()
Don’t forget to restart Explorer one more time.