How to Free Up Disk Space After Upgrading Windows 10
If you installed Windows 10 over a previous Windows version like Windows 8 or Windows 7, or you upgraded the OS to the latest feature update available, you may notice that free disk space on your system drive was considerably reduced.
Unfortunately, this is how modern operating systems work. It is their default behavior. When you do an in-place upgrade from a previous version of Windows, the setup program keeps plenty of files from the earlier installed OS during the upgrade and fills your hard drive with files. You may never need again those files if your upgrade is successful.
The reason setup saves these files is so that if something goes wrong during setup, it can safely rollback to the earlier version of Windows.
However, if your upgrade was successful and you’ve got everything working perfectly, then there’s no need to keep these files. You can reclaim all the wasted disk space by following these simple instructions.
To Free Up Disk Space After Upgrading Windows 10,
- Press Win + I shortcut keys to open the Settings app.
- Click on System, then click Storage on the left.
- Click on the link Configure Storage Sense or run it now on the right side.

- On the next page, find and turn on (check) the Delete previous versions of Windows check box.
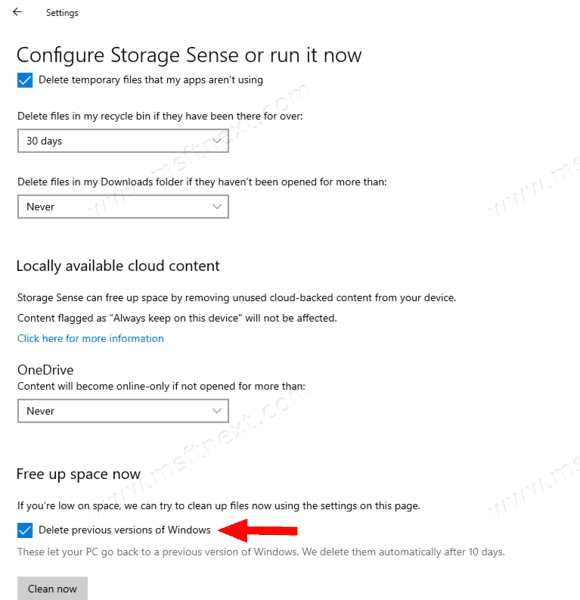
- Click on the Clean now button.
You can see how easy it is to reclaim disk space which was unnecessarily being consumed after the upgrade from a previous Windows build or version to Windows 10.
Storage Sense is a nice, modern replacement for Disk Cleanup. It allows you to maintain certain folders by preventing them from getting too large and clean them up automatically. Storage Sense can be used to remove Windows upgrade log files, system-created Windows Error Reporting Files, Windows Defender Antivirus temporary files, Thumbnails, Temporary Internet Files, Device driver packages, DirectX Shader Cache, Downloaded Program Files, Delivery Optimization Files, old System log files, System error memory dump files and minidumps, temporary Windows update files, and more.