Here’s how remove Stuck Jobs from Printer Queue in Windows 10.
Sometimes it is hard to remove stuck jobs from Printer Queue in Windows 10. That’s because Windows ignores the clear queue command for a local or network printer connected to your computer or laptop. While Windows 10 provides an option in the user interface, it doesn’t work reliable. This tutorial will provide you a faster and reliable solution.
If you are not familiar with Printer Queue in Windows 10, check out how to find it.
Windows has a Print Spooler service that is responsible for printing documents. Printer jobs are saved in the C: \ Windows \ System32 \ spool \ PRINTERS folder. Your printer half connects to this service and receives documents related to it in order to print them. If a document gets stuck in the queue, it is constantly displayed in the user interface. Sometimes it helps to turn the printer off and on again. This depends on the printer driver and does not work reliably for all printer models. In Windows 10, you can manage the print queue using Devices and Printers in the Classic Control Panel or in Settings -> Devices -> Printers and Scanners. If you cannot delete the print job from there, try the following.
Remove Stuck Jobs from Printer Queue in Windows 10
- Open a command prompt as Administrator.
- Type or copy-paste the following command:
net stop spooler.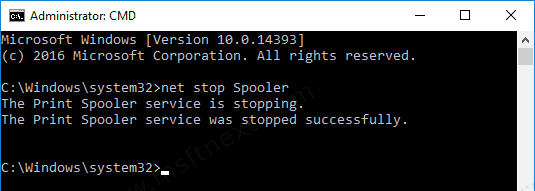
- Enter the following command:
del /s /f /q C:\Windows\System32\spool\PRINTERS\*.*. This will remove all files in the PRINTERS folder. - Alternatively, start File Explorer and navigate to the folder
C:\Windows\System32\spool\PRINTERS.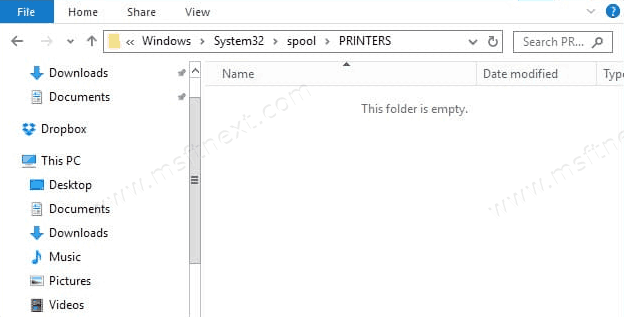
- Remove all files and folders you see under that folder location.
- Return to the command prompt and run the command
net start spooler.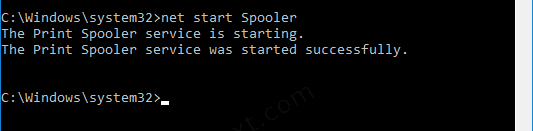
This will clear all the jobs for all printers.
If some job got stuck, it will be removed without the restarting the printer device, and you can continue you work without issues.