Here are the instructions on how to upgrade from Windows 11 Home Edition to Pro Edition without the need for reinstallation. By changing the product key and activating it, users can upgrade to Pro Edition for a cost of $99.
What’s the Difference Between Windows 11 Home and Pro?
Most Windows operating systems are available in two or more versions, typically Home and Professional (Pro). These versions cater to different types of users, with distinct feature sets.
In simpler terms, the Home version is designed for general users and includes all the features that an average Windows user would need. The Pro version, on the other hand, is geared toward business or enterprise systems and offers additional features to meet the requirements of that field.
Windows 11 Pro includes a number of features not included in Windows 11 Home.
BitLocker Device Encryption
BitLocker Device Encryption is a service that encrypts data using 128-bit or 256-bit AES encryption and TPM 2.0. This service is particularly useful if a device is lost or stolen, as it ensures that others cannot access your information.
Windows Information Protection (WIP)
Windows Information Protection (WIP) is a service that safeguards data against accidental data leaks on any company-owned or employee devices. This service is designed to protect against unauthorized access and prevent sensitive information from being unintentionally shared.
Assigned Access
The Assigned Access feature allows multiple users to access the same device using different accounts, keeping their digital identities and data separate.
Dynamic Provisioning
Dynamic Provisioning simplifies the process of setting up new Windows 11 devices without requiring the creation of a new image.
Enterprise State Roaming
Enterprise State Roaming is a feature that allows users to access their accounts from multiple devices without having to configure each new device. This feature is available to organizations with Azure Premium.
Group Policy
Group Policy enables you to manage various aspects of PCs, accounts, groups, networks, and printers using Windows Server.
The Group Policy Editor is a user-friendly tool that allows users to enable and disable Windows 11 functions without altering the registry.
Kiosk Mode Setup
Kiosk Mode Setup is a feature that enables you to set up dedicated experiences for specific purpose devices, such as ATMs.
Microsoft Store for Business
Windows 11 Pro offers access to the Microsoft Store for Business, which contains additional apps for business use.
Mobile Device Management (MDM)
Mobile Device Management (MDM) enables cloud-based management of PCs and other devices.
Support for Active Directory
Support for Active Directory allows IT staff to manage PCs, policies, and user accounts by pairing Windows 11 with Windows Server.
Azure Active Directory
Support for Azure Active Directory allows users to use the same Microsoft account login to access Windows 11, Microsoft 365, and other Microsoft services.
Windows Update for Business
Windows Update for Business enables IT staff to determine when updates are performed, test them on specific devices, and execute a time-specific update for more efficient management.
Hyper-V
Hyper-V is a tool that enables users to create virtual machines within Windows 11.
Windows Sandbox
Windows Sandbox offers users a way to have a lightweight instance of Windows 11 running in an isolated shell, similar to Hyper-V. This is useful for testing apps before installing them on a PC.
Remote Desktop Connection
Remote Desktop Connection allows Windows 11 Pro to act as both a host and client for a remote connection, while the Home edition only acts as a client.
Local account
Windows 11 Pro users can set up their PC with a local account, while Windows 11 Home users must have an internet connection to set up their PC.
Overall, Windows 11 Pro provides increased hardware capabilities, supporting up to 2 CPUs (128 cores) and 2 TB RAM, whereas the Home edition supports only 1 CPU (64 cores) and 128 GB RAM. However, for gaming purposes, the hardware expansion offered by the Pro version is unlikely to be necessary.
For standard users, Windows 11 Home provides ample features to meet their needs. However, for professional users who require enterprise-targeted functions in their daily work, Windows 11 Pro is the best option.
Upgrade Windows Home to Windows Pro
To upgrade from Home to Pro, there are two methods available. Before proceeding, ensure that Windows Home is activated. Once activated, follow one of the methods outlined below to upgrade to Pro. Note that these steps are applicable only to devices currently running an activated copy of Windows 10/11 Home.
Using Windows 11 or 10 Pro product key
- Click on the Windows logo button in the taskbar (Start button).
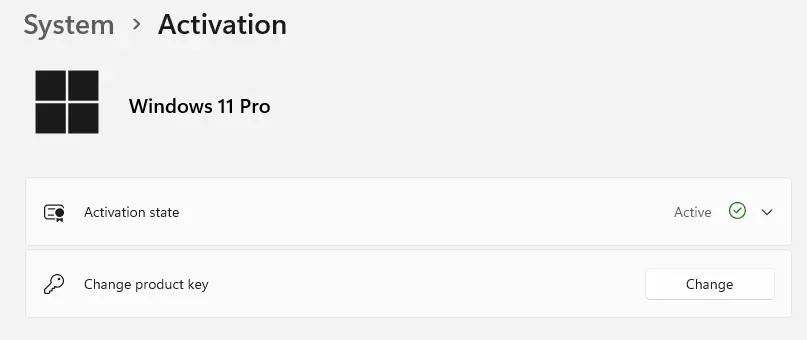
- Select Settings and go to System > Activation.
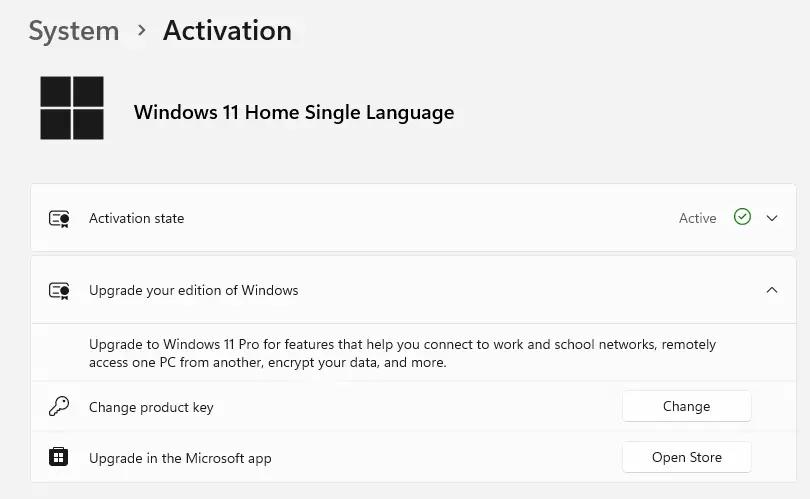
Image by winhelponline.com - Click on “Change product key,” and then click “Start“.
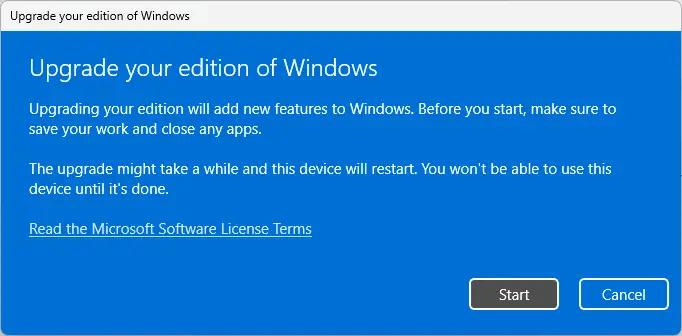
Click Start here. Image by winhelponline.com - Type your 25-character product key for Windows 11 Pro. You can use Windows 10 key too.
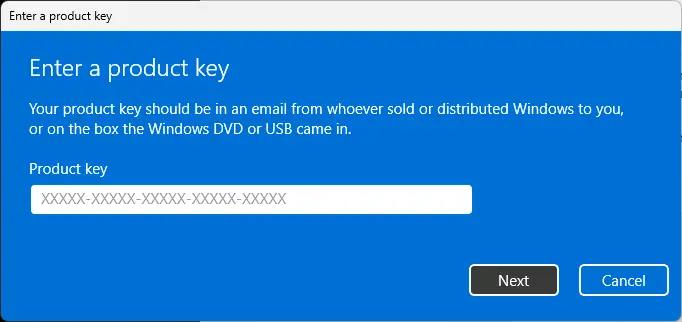
Enter product key. Image by winhelponline.com - Now click the Next button to initiate the transition from Windows Home to Windows 11 Pro.
- Wait for Windows to restart.
You now have Windows 11 Pro.
Upgrade without a Windows 11 Pro key
If you do not have a Windows 11 Pro product key, follow these steps.
- Click on Start and select Settings.
- Choose System and then select Activation.
- Under the “Upgrade your edition of Windows” section, click on “Open Store.”
- Make sure that you are signed in with your Microsoft account.
- Purchase Windows 10/11 Pro.
- Once you have confirmed your purchase, you will be prompted to install Windows Pro and restart your PC.
- After restarting, you will be running Windows 11 Pro.
Error 8004230F Unable to upgrade your edition
If you encounter error 8004230F when attempting to upgrade your Windows edition via Settings, it means that the System Restore feature is malfunctioning. The error message says:
We can’t activate Windows on this device right now. You can try activating again later or go to the Store to buy genuine Windows. (0x8004230f)
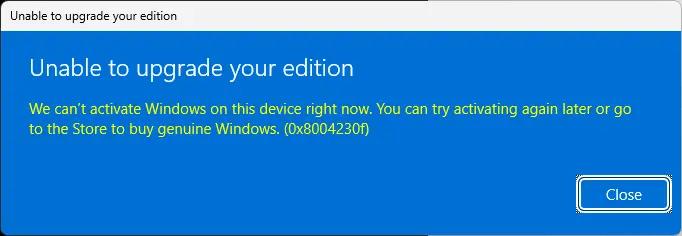
The error 8004230F, also known as “VSS_E_UNEXPECTED_PROVIDER_ERROR,” is a VSS error code that occurs during the upgrade process. It means that the upgrade process is unable to create a Restore Point. In the Event Log, you may find the following message.
Log Name: Application
Source: System Restore
Date:
Event ID: 8193
Task Category: None
Level: Error
Keywords: Classic
User: N/A
Computer: VOSTRO-3470
Description:
Failed to create restore point (Process = C:\WINDOWS\system32\SystemSettingsAdminFlows.exe EnterProductKey; Description = Upgrade your edition of Windows; Error = 0x8004230f).
Here’s how to fix the issue.
Fix the Error 8004230F
Step 1. Reconfigure the Windows services.
- Right-click on Start, and select Run.
- Type Services.msc and click OK.
- Double-click on “Volume Shadow Copy” and set its start type to Manual.
- Click Start to manually start the service. Take note of any error messages that appear.
- Double-click on “Virtual Disk” and set its start type to Manual.
- Click Start to manually start the service. Take note of any error messages that appear.
- Double-click on “Microsoft Software Shadow Copy Provider” and set its start type to Automatic (delayed start).
- Click Start to manually start the service if it is not already running. Take note of any error messages that appear.
- Exit the Services console.
Step 2. Update the Registry value for UpperFilters
To fix the system restore 0x81000203 error related to UpperFilters in the Registry, follow these steps.
- Right-click on Start, and select Run.
- Launch
regedit.exeand navigate to the following registry key:HKEY_LOCAL_MACHINE\SYSTEM\CurrentControlSet\Control\Class{71a27cdd-812a-11d0-bec7-08002be2092f} - Create a new REG_MULTI_SZ value named UpperFilters.
- Double-click on UpperFilters and in the Value data field, type volsnap. Click OK.
- When prompted with the following message: “Data of type REG_MULTI_SZ cannot contain empty strings. Registry Editor will remove all empty strings found.” click OK.
- Verify that the value/data appears as exactly as in this picture.
- Exit the Registry Editor and restart Windows to apply the changes.
The following is information about the GUID for Storage Volumes:
Class: Volume
ClassGuid: {71a27cdd-812a-11d0-bec7-08002be2092f}
This class pertains to storage volumes that are established by the logical volume manager and class drivers that create device objects to represent storage volumes, such as the system disk class driver.
Now you should be able to upgrade Windows 11 Home to Windows 11 Pro without issues.
Source: winhelponline.