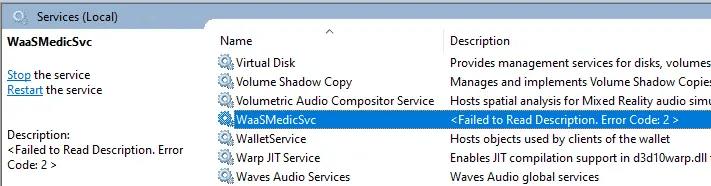
When you access the Services console on your Windows 11 computer, you may notice that the Windows Update Medic Service is missing from the list. If you scroll through the services list, you will see that it is listed as WaaSMedicSvc instead of its display name, which is Windows Update Medic Service.
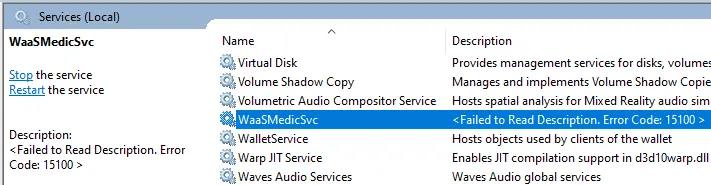
Additionally, the following error may be displayed in the description column for WaasMedicSvc: Failed to Read Description. Error Code: 2. Or it may say Failed to Read Description. Error Code: 15100.
The Windows Update Medic Service is responsible for verifying and repairing Windows update components. This service appears as WaaSMedicSVC.exe in the service menu and is often associated with Windows Update as a complementary software. Its internal name that one can use with the sc/service commands is WaaSMedicSvc.
When encountering Error 2, it means ERROR_FILE_NOT_FOUND, while Error 15100 indicates that the DLL does not have the specific string resource embedded in it.
The “DisplayName” and “Description” registry values of the Windows Update Medic Service refer to WaaSMedicSvcImpl.dll. However, in Windows 11 22H2, this module may not exist in most systems.
“Description”=”@WaaSMedicSvcImpl.dll,-101”
“DisplayName”=”@WaaSMedicSvcImpl.dll,-100”
Restoring the missing WassMedicSvcImpl.dll module manually or by running SFC will not resolve the issue, as you will still encounter error code 15100 for WaasMedicSvc. This is due to the DLL not having the specific string resource (100 and 101) embedded in it.
To fix the WaasMedicSvc service issue, follow these steps.
WaaSMedicSvc – Failed to Read Description – Error Code 2 or 15100
- Open the Registry Editor by running regedit.exe and go to this key:
HKEY_LOCAL_MACHINE\SYSTEM\CurrentControlSet\Services\WaaSMedicSvc. - Double-click on the “Description” line and enter the following text: Enables remediation and protection of Windows Update components.
- Similarly change “DisplayName” and set it to the following: Windows Update Medic Service.
- Close the Registry Editor app.
- Right-click the Start button and select Shut down or sign out -> Restart.This solution addresses the issue with the display name and description of the Windows Update Medic Service.
Source: Winhelponline