Getting back the classic Notepad in Windows 11 can be useful if you don’t like the modern app that replaced it. Windows 11 includes an updated Notepad that automatically replaces the old/classic program. The new app is written with support for UWP technologies, supports colored emoji, dark mode, RichEdit’s rich formatting capabilities, Ctrl+} to switch between matching square and parentheses, and much more. In it you will also find multi-level undo, drag and drop and automatic detection of links in the text.
However, many users prefer desktop apps over programs from the Microsoft Store. Classic Notepad works much faster, starts up faster, although it loses a little in terms of capabilities to its successor.
This is what the old and new Notepads look like in Windows 11.

Unfortunately, the new Notepad is not without flaws. For example, it fully hides the old version of Notepad in the “Open With” menu and the “Default Apps” list. Therefore, it will not be easy to run the classic version. Trying to run c:\windows\notepad.exe instead will redirect you to the app from the store. This redirect is associated with the app execution alias.
Let’s see how to get old Notepad back after installing or uninstalling the modern Store app in Windows 11.
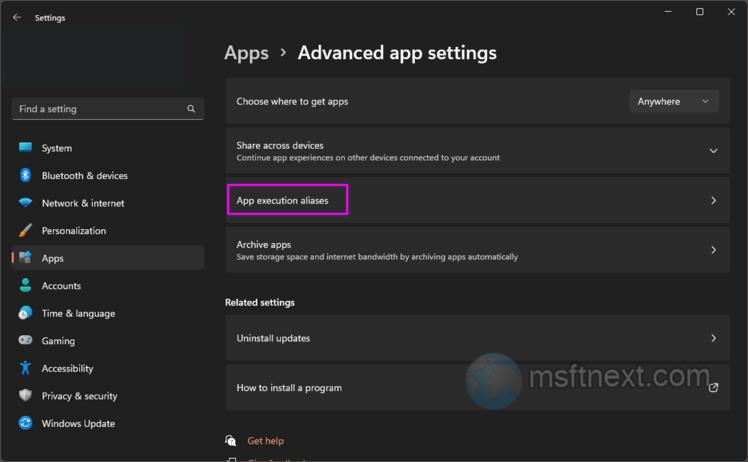
Get Back Old Classic Notepad for Windows 11
- Open the Settings app by pressing the ⊞ Win + I keyboard shortcut.
- On the left, select “Apps” and on the right, click “Advanced app settings“.

- On the next page, select “App Execution Aliases“.
- Disable the Notepad alias by turning off the toggle.
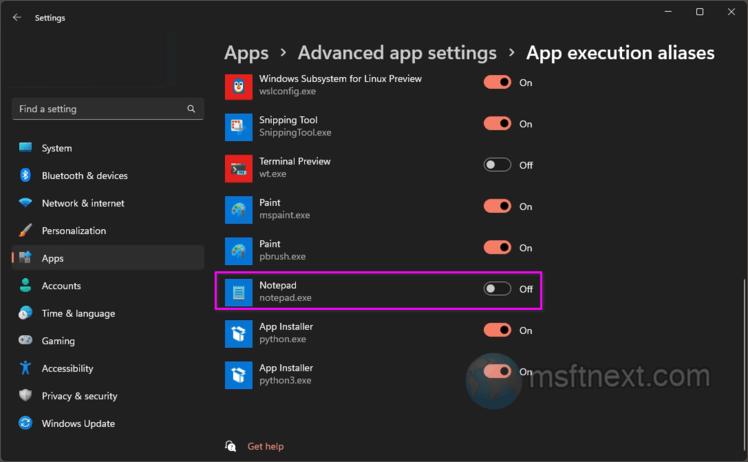
Now, when you double-click a text file or run Notepad.exe from the ⊞ Win + R Run dialog, classic Notepad will open. You can still start the new Notepad from the Start menu. For him, there will be a working shortcut. So there are now both Notepads will coexist peacefully.
However, this method will not return Classic Notebook in the Open With dialog box. In addition, you will surely see the error message “Cannot associate a file type with this program” sooner or later, which we will now look at below.
Notepad error “Cannot associate file type with this program”
Disabling the execution alias for Notepad, as we covered earlier, or completely uninstalling the modern Notepad app via Options > Apps & Features will allow you to successfully run classic Notepad.
However, as already mentioned, classic Notepad will not appear in the Open With dialog box and in the Open With menu in File Explorer. This is prevented by special settings in the Registry. Attempting to browse and select c:\windows\notepad.exe in the Open With dialog will result in the following error:
Cannot associate file type with this program
The program you have selected cannot be associated with this file type. Please choose another program.
If this problem is relevant to you, then it is better to use another method, as shown in the next section of this article. There we will edit the registry a bit.
How to restore classic Notepad through the registry
- Download REG files in ZIP archive from this link.
- Extract it to any folder of your choice, such as your desktop.
- Now open the
add_classic_notepad.regfile. Confirm the User Account Control prompt by clicking Yes. - Now you have completely restored Notepad!
After restoring old Notepad this way, you should be able to still run it alongside the modern Notepad app. Or, you can uninstall the “Store” Notepad app if you don’t want to use it.
Also, in the archive you downloaded, there is an undo file called remove_classic_notepad.reg. Use it if you want to return everything as it was and hide the classic Notepad. After that, you will have only the modern app available again.
Finally, if you’ve deleted Store Notepad, you can get it back by following this link: Microsoft Store Notepad.
Source: Winhelponline