You may want to move the Users folder to free up the disk space in the system partition where Windows is installed. During the Windows installation process, it creates multiple folders in the root of the system partition. Some of them are visible by default, including “Program Files”, “Windows”, “PerfLogs”, “Users” (Users). Also, two folders are hidden by default, “ProgramData” and “System Volume Information”. Among these directories, the “Users” folder stands apart. It is the main folder that stores the data of all user accounts created in Windows.
When you reinstall the OS, Windows will create a new “Users” folder. Previously saved individual account settings and installed programs won’t be accessible. Many users often set up periodical backup copies of their profiles.
Profile directory may also become huge in size if you install many apps and store a lot of documents. This reduces the free disk spaces on the system partition and slows down the OS.
As a solution you can move the Users folder to another drive. The partition where you want to move the Users folder must be NTFS file system. It also shouldn’t contain files from other installed operating systems.
On the live system, there will be symbolic links in the Users folder will still be redirected to the original location on the C: Drive. This can break older programs released in 2007 or earlier. To reduce all possible risks, it is better to transfer the Users folder to another drive at the stage of installing the operating system.
Move the Users directory to another drive
To move the “Users” directory from C: to another drive, you need to perform the following steps.
- Create a new “answers” XML file from the Windows Setup Program.
- Copy it on your bootable drive with Windows.
- Start installing windows and enter Audit Mode in Windows setup.
- Run the Windows setup program with the answers file.
Create an answers file
- Download this move.xml file.
- Extract the XML file and modify it following your requirements.
- Change the
AMD64value tox86if you run a 32-bit Windows. - Change the
D:\Usersvalue to the drive you want to have the users folder on.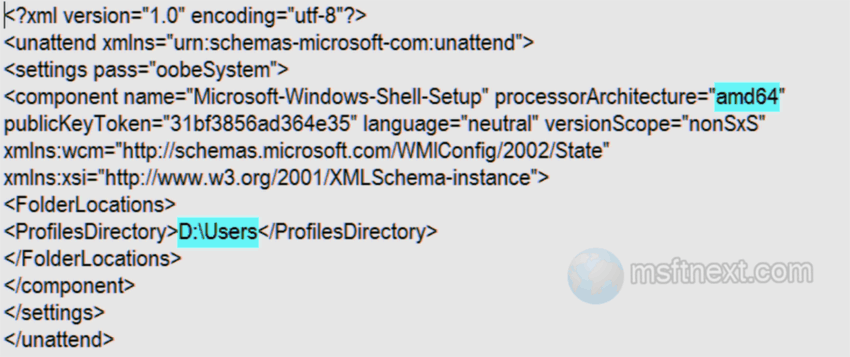
- Copy the file to the root of your installation USB drive.
Now you are ready to move the users folder.
Move the Users folder
- Start your computer from your USB drive to install Windows.
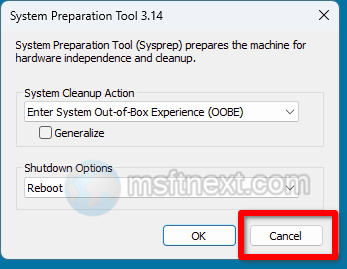
- When on the OOBE screen, press Ctrl + Shift + F3, to enter the Audit mode.

- After entering Audit, the Sysprep utility window will appear on the screen. Close it by clicking “Cancel”.
- Go to the root of the installation flash drive and copy the prepared
move.xmlanswer file to the location of the user partition. - Now, open command prompt as administrator, and run these two commands:
net stop wmpnetworksvc-
C:\Windows\system32\sysprep\sysprep.exe /oobe /reboot /unattend:D:\move.xml. Correct the path to the move.xml file if required.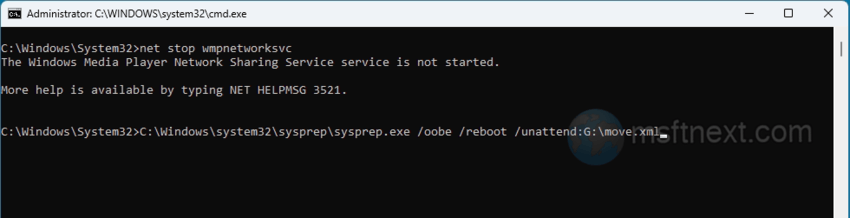
- When executing the second command, the Sysprep window will appear on the screen, click “OK” in it.
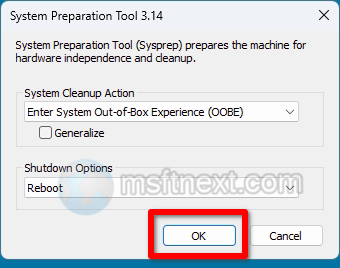
- The computer will restart and you will be taken to the OOBE screen, where you will need to select the region, language, and other operating system default options. I.e. you should now install Windows as usual.
If everything went well, you should see the Users folder in the new location when the Windows installation is complete.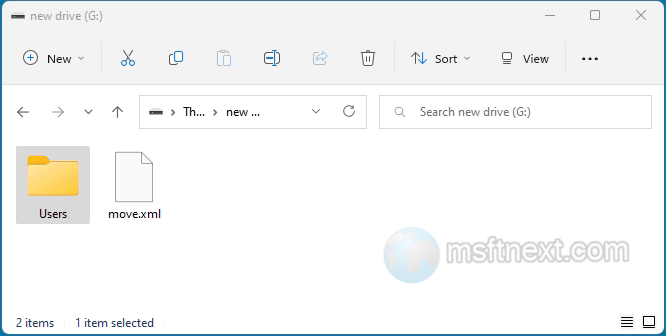
This is tested on Windows 11 and Windows 10.
Hi, sorry for my English, I’m from Chile. Try to do this process with Windows 11 installing and VMWare Workstation and after restarting from applying the commands, it gave me error messages that did not allow the installation to finish. Could it be that you are doing something wrong or because of doing it on a virtual machine this procedure does not work? Thanks.