If your computer has an NVIDIA graphics card, you may want to remove games from its GeForce Experience app. This software product from graphics card manufacturer NVIDIA serves two purposes: updating drivers and optimizing PC games that use NVIDIA graphics. There are two ways to add games to the app listing: in manual mode and in automated mode, when the application scans the hard drive for installed games.
After you add a game to GeForce Experience, it is impossible to remove it from the user interface. Sadly, this task will require a non-standard approach. The option to clean up games added to the program in GeForce Experience is absent. At least in the app version from 2020 it is missing.
So, in order to remove the optimized games from the program listing (the games themselves, of course, will not be uninstalled), do the following.
Remove games from NVIDIA GeForce Experience
- First of all, open the Services management snap-in with the ⊞ Win +R >
services.msccommand, find and temporarily stop all NVIDIA services. - Open the File Explorer app using the ⊞ Win +E hotkey, and browse it to the
%userprofile%\AppData\Local\NVIDIA\NvBackendfolder. - Now delete the files
journalBS.jour.dat,journalBS.jour.dat.bak,journalBS.main.xmlandjournalBS.main.xml.bakfrom it, creating a backup copy of them before deleting.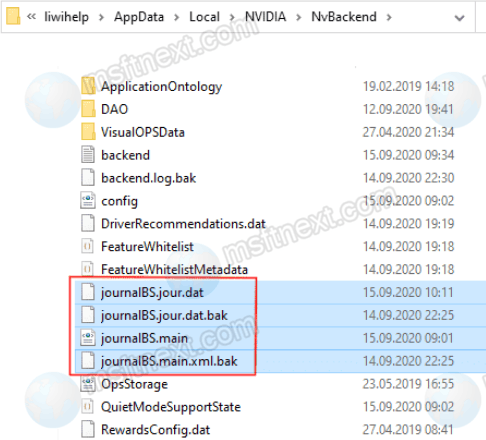
- Restart your computer and launch GeForce Experience. Added games should be removed from the main section of the application.

Note: It is not necessary to start the previously stopped services manually; they start automatically when the system boots.
A more radical way to get rid of the games added to the app list is to completely reinstall GeForce Experience.
If you decide to go with this method, then after uninstalling the program, you will need to delete all NVIDIA directories in the AppData folder. Also, check out the ProgramData and Program Files folders for the NVIDIA-related data.