Nowadays in Windows 11, you may rarely need to remove pending downloaded Windows Update files. Updates are relatively stable and fast. Monthly patches no longer cause crippling headaches; they are much faster and more reliable than ever before. Still, Windows is Windows, and it is far from perfect. Windows Update may still hang or throw an unexpected error. You may want to delete Windows Update files in Windows 11 to start over in such a case.
This tutorial will show you how to remove downloaded Windows Update files before the operating system installs them. But first, we need to figure out what exactly we are going to remove.
Windows 11, just like Windows 10, is constantly on the watch for new updates. The operating system automatically downloads available patches to keep your computer safe and up to date.
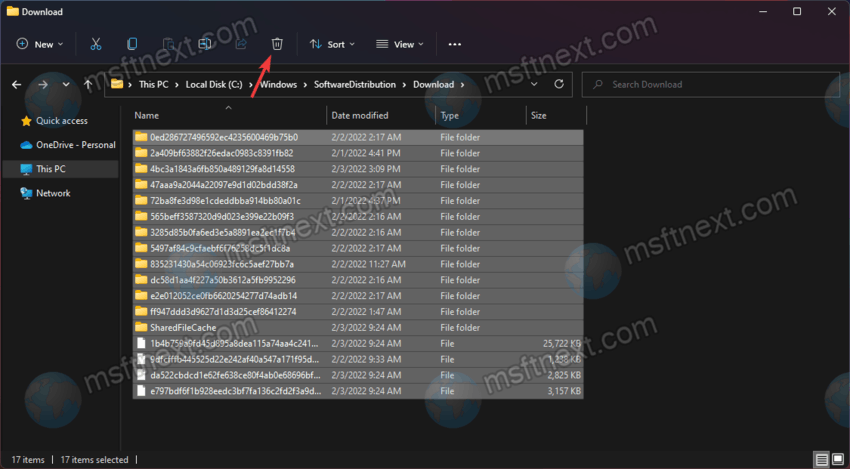
Windows 11 stores downloaded Windows Update files on drive C in the Windows\SoftwareDistribution\Download folder.
If, for some reason, Windows Update cannot install a fresh set of patches, deleting downloaded files may help you fix the problem. You need to stop the Windows Update service before you delete Windows Update files.
How to remove downloaded Windows Update files?
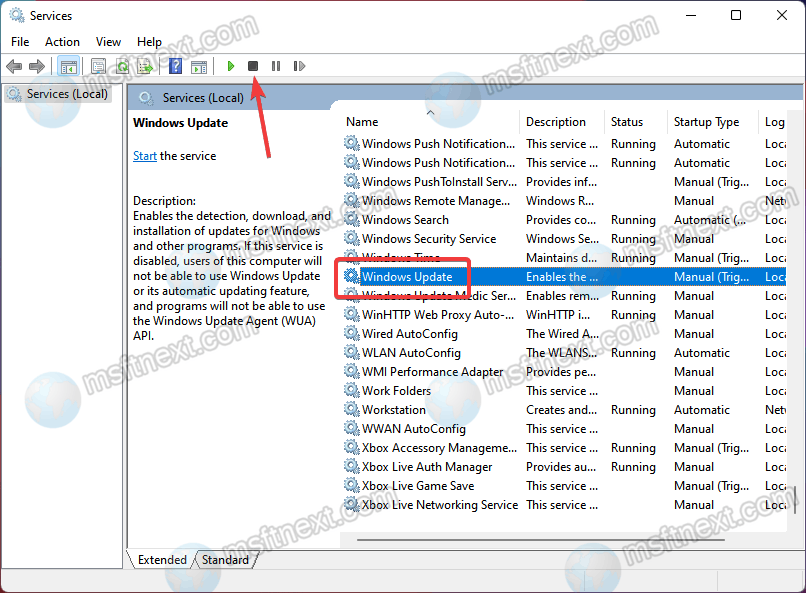
- Press ⊞ Win + R on your keyboard and enter the
services.msccommand. - In a new window, find the Windows Update service. Click it, then press the stop button on the toolbar.
- Next, open File Explorer and go to C:\Windows\SoftwareDistribution\Download. Delete everything in that folder. Note that this procedure may require Administrative privileges.
- Restart your computer. There is no need to restart the Windows Update service as the operating system will do it for you after the restart.
You can create a simple script to automate the process described above. The file will let you delete Windows Update files in Windows 11 with a single click. Here are the commands you need.
Remove pending updates in Windows 11
- Right-click the Start button and select Windows Terminal (Admin).
- Select Command Prompt in Windows Terminal (Ctrl + ⇧ Shift + 2 ).
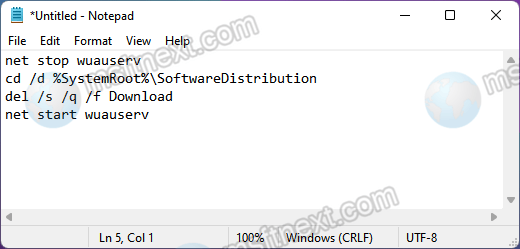
- Type and run these commands, one after one.
- net stop wuauserv
- cd /d %SystemRoot%\SoftwareDistribution
- del /s /q /f Download
- net start wuauserv
- Restart your computer.
This is how you remove pending downloaded updates in Windows 11.
How does it work
The first command stops the Windows Update service. The next command opens the Windows Update files folder (SoftwareDistribution). The follow up command will delete all the downloaded files. Finally, the last command restarts the Windows Update service.
Create a script file
Open Notepad and paste the following commands:
net stop wuauserv

cd /d %SystemRoot%\SoftwareDistribution

del /s /q /f Download

net start wuauserv
Save the file with the .cmd extension. For example, script.cmd.
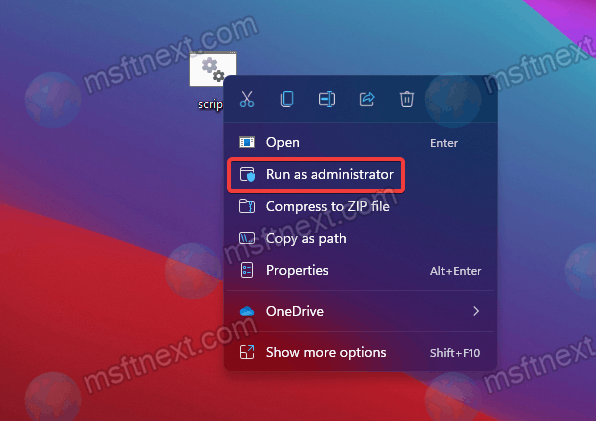
Next time you need to delete pending updates, right-click the file and select Run as Administrator.
You may also want to do that if the Windows Update folder takes an enormous amount of space on drive C.
That is it. Now you know how to delete Windows Update files in Windows 11.